My daughter wore this shirt for a long time and when she finally grew out of it, it was hard to part with it. We thought of cutting off the front and sewing it onto another new shirt and then we came up with this t-shirt pillow idea.
Stuff the arms and sew it, then fill the body and stitch around the neck. Now you have a very fluffy t-shirt with arms for hugging!
07 December 2010


29 November 2010
Recycled Tetra Pack Xmas Stockings
 |
I was looking for an alternative to stitching stockings with a big group of kids as Santa had confirmed that he would be visiting Mustard Seeds Library this year. The age variations in the group would make sewing a bit difficult.
I came up with this idea, which is a great way to recycle tetra packs.
First, clean out and dry tetra packs, then cut them so that the front stays as tall as possible and the back is a nice little box size for holding a few holiday goodies in *see photo below.
Now cut a stocking shape that will nicely cover the front of the tetra pack and make enough of these on paper to hand out to all the kids in your group.
I made a line and the top and emphasized the heel and toe. Ask children to write their names along the top cuff of the stocking so Santa knows which stocking belongs to who.
Kids can now get arty and decorate their paper stocking with sketch pens, glitter, and color...
Lastly, these get glued onto the front of the tetra pack. A staple at the top is a good idea to be sure to hold them together.
Have the children set these out and explain the stocking tradition if they don't know it.
Next week when they come back they will be surprised to see that their stockings are full because Santa has paid a visit.
 |
| *This shows how the paper stocking is attached to the tetra pack. Keep one side of the tetra pack tall when you cut to support the stocking |
13 November 2010
Felt Christmas Trees
Once again felt saves the day! This is a wonderful project for beginner level stitchers during the holiday season. It uses a simple run stitch and the blanket stitch and kids can manage to finish it in one or two sessions.
You need to prepare:
Needles
Thread
Felt trees x 2
Felt star
Brown cotton in strips for trunk
Thin ribbon for hanging
Sequins, bobbles and buttons, etc.
Scissors
Glue
Stuffing of your choice
Before class, I prepared two pieces of green felt cut from a triangle (use an old cereal box folded in half to make one) pattern for each student
Next, I cut small yellow circles and turned them into stars by cutting little slits into them...it worked.
Each child also received a ribbon and a long piece of brown fabric which is folded in half to attach as the trunk of the tree. The kit was complete.
Each child sews their star into place first and then it's time to decorate.
I put small sequins and buttons, etc. into dishes so that the kids could all browse through the goods and share while sewing decorations onto the front of their trees. I suggested that children put a smidge of glue down first to make it easier to hold things in place while they stitched them on securely.
Next we folded the trunk and stitched that onto the front with the running stitch - careful to make sure it is in the center. Once in place we blanket stitched around the tree with the two layers together at last. Leave a small bit at the bottom to stuff with poly-fill or old cloth scraps. This is when an assistant could come in handy to help with knots and needles that fall off...
Some of the children decided to stitch the two sides of the trunk and stuff that too, although that wasn't the original plan. A nice innovation.
They all wrote their names and we decided to send them to our penpals in Germany as gifts!
The girls in our afterschool class made wreaths too.

You need to prepare:
Needles
Thread
Felt trees x 2
Felt star
Brown cotton in strips for trunk
Thin ribbon for hanging
Sequins, bobbles and buttons, etc.
Scissors
Glue
Stuffing of your choice
Before class, I prepared two pieces of green felt cut from a triangle (use an old cereal box folded in half to make one) pattern for each student
Next, I cut small yellow circles and turned them into stars by cutting little slits into them...it worked.
Each child also received a ribbon and a long piece of brown fabric which is folded in half to attach as the trunk of the tree. The kit was complete.
Each child sews their star into place first and then it's time to decorate.
I put small sequins and buttons, etc. into dishes so that the kids could all browse through the goods and share while sewing decorations onto the front of their trees. I suggested that children put a smidge of glue down first to make it easier to hold things in place while they stitched them on securely.
Next we folded the trunk and stitched that onto the front with the running stitch - careful to make sure it is in the center. Once in place we blanket stitched around the tree with the two layers together at last. Leave a small bit at the bottom to stuff with poly-fill or old cloth scraps. This is when an assistant could come in handy to help with knots and needles that fall off...
Some of the children decided to stitch the two sides of the trunk and stuff that too, although that wasn't the original plan. A nice innovation.
They all wrote their names and we decided to send them to our penpals in Germany as gifts!
The girls in our afterschool class made wreaths too.
12 May 2010
FLOPPY DISC CANVASES
If you have a big bag of floppy disks sitting around from computer-yesteryear, let them free!
We used acrylic paints on them, and heavily coated our little canvases with bright designs. Children naturally seemed to tend toward the abstract. This particular one, with the flower, is the signature flower of one of my very special students!
Before class we had a great discussion on why people put art on walls and in homes and museums and the final gist of the discussion was to inspire us to smile and to think!
These can be used as coasters or group them together like tiles and do a whole wall of mini-canvases.

We used acrylic paints on them, and heavily coated our little canvases with bright designs. Children naturally seemed to tend toward the abstract. This particular one, with the flower, is the signature flower of one of my very special students!
Before class we had a great discussion on why people put art on walls and in homes and museums and the final gist of the discussion was to inspire us to smile and to think!
These can be used as coasters or group them together like tiles and do a whole wall of mini-canvases.
22 April 2010
RECYCLED MEMO PADS
You will need:
- Paper (used on one side)
- Old cardboard packaging
- Scissors/Paper cutter
- Heavy-duty stapler
First neatly trim the back and front of a cereal box or other packaging so that they are the same size.
Now cut at least 25 sheets of used paper to the exact same size.
Sandwich the paper in between the front and back of the cardboard.
Staple.
We cut a rubber stamp out of an eraser and pressed re-use on some of the pages as an eco-reminder.
Memo away!


- Paper (used on one side)
- Old cardboard packaging
- Scissors/Paper cutter
- Heavy-duty stapler
First neatly trim the back and front of a cereal box or other packaging so that they are the same size.
Now cut at least 25 sheets of used paper to the exact same size.
Sandwich the paper in between the front and back of the cardboard.
Staple.
We cut a rubber stamp out of an eraser and pressed re-use on some of the pages as an eco-reminder.
Memo away!

The kids and I made these to sell at their school's Earth Day event.
We raised money for local environment groups selling eco-crafts.
12 January 2010
Homemade Peanut Butter
The kids and I went to a children's film festival last year. One of the films showed two children in the kitchen alone making peanut butter. There was talking but it was in a language we couldn't understan, so we enjoyed the musical background. The film ended with the two children, most likely brother and sister, eating their peanut butter with honey and bananas on toast...and giggling a lot with a big mess around them!
Since viewing that short film, we've been wanting to make our own peanut butter and now we have. It's easy and tasty. All you really need is peanuts, oil and a mixee/food processor. We also added a pinch of salt and sugar!
Our mixee is a small grinder so we made several small batches. Add unsalted, roasted peanuts to the rim, throw in a dash or two of salt and a heavy hand of sugar. GRRRRRRRIND til smooth. You can leave it a bit crunchy too, if that's your thang.
We put it on toast and buns for tasting. Then saltine crackers. We'll try some peanut butter cookies too.
Be sure to have children make their own labels listing ingredients and nutritional info. You can look this up with them.

Since viewing that short film, we've been wanting to make our own peanut butter and now we have. It's easy and tasty. All you really need is peanuts, oil and a mixee/food processor. We also added a pinch of salt and sugar!
Our mixee is a small grinder so we made several small batches. Add unsalted, roasted peanuts to the rim, throw in a dash or two of salt and a heavy hand of sugar. GRRRRRRRIND til smooth. You can leave it a bit crunchy too, if that's your thang.
We put it on toast and buns for tasting. Then saltine crackers. We'll try some peanut butter cookies too.
Be sure to have children make their own labels listing ingredients and nutritional info. You can look this up with them.
11 January 2010
WALL PAINTING
Give your kids a bit of your wall space and let them surprise you! It takes a bit of courage and a bit of guidance but I have found that the kids usually surprise you only in positive, completely creative ways!
A method that works well if you are working with many children on one wall is to portion the wall off with pencil lines (or circles) first and let them work in their own spot.
At the school where I work, we took a long wall and made boxes in pencil all along the base of the classroom so the kids could actually sit and paint their own box. This style worked very well and we have taken it into village schools as well - with our own students conducting the workshops!
Use an acrylic-base paint for longer lived art!


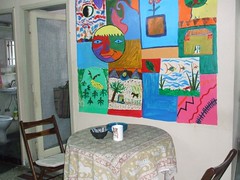
A method that works well if you are working with many children on one wall is to portion the wall off with pencil lines (or circles) first and let them work in their own spot.
At the school where I work, we took a long wall and made boxes in pencil all along the base of the classroom so the kids could actually sit and paint their own box. This style worked very well and we have taken it into village schools as well - with our own students conducting the workshops!
Use an acrylic-base paint for longer lived art!


12 October 2009
Make a Compost
But do give it a try with your kids, because it as fun as all get out. I love my little worms and taking care of these pets is so easy and utilitarian... your topsoil will be the talk of the town.
Start with a big container. For the past year, I have been breeding worms in an old bucket but have been eyeing other containers to expand to something larger. I found terracotta and cement flower pots and chose to make the new vermi-bin in the cement one, mainly because of its size.
Step 1: Make a bed for your worms to rest in when they are not eating. You can take big sheets of newspaper and form tightly wadded balls to make about two layers of bedding at the bottom of your chosen bin. Now dampen this.
Step 2: Throw a bit of sand on top.
Step 3: Add your worms. You will need to get worms from another vermi-composter (that will be YOU soon enough). The type you need are called red wigglers. To be honest, my worms found me and asked me to start a vermi-compost for them. They were delivered in a load of cow manure for my garden; and when I looked at them I just knew they'd be happy in my bucket. They were reddish and wriggling...but are very, very tiny. THere are tons of them now because I feed them every few weeks.
Step 4: Don't become too attached to your worms...
Step 5: Now, in one area of the bin place your kitchen waste (tea/coffee grounds, rotten veggies, banana peels, eggshells, fruit peels, etc). This can pretty much include anything except dairy, meat and fish scraps. Almost everything else goes. My worms are currently working on the waste scraps from an untreated wooden dinosaur kit. You need to add waste in bundles so that there is always a resting area for the worms (the bedding and soil).
Step 6: Cover the whole thing with a little more dirt and shredded newspaper. Dampen this just a bit too.
Step 7: Now cover the entire compost bin with a big board or burlap tarp. SSssssh. THe worms like it to be dark and I presume quiet.
MAINTENANCE
The trick to maintaining things inside is to take peeks and see just what's happening in there. It isn't good if the bin gets too wet and mushy (a big mess, in fact) so you may need to move everything to one side and put in new newspaper bedding balls to absorb excess moisture. On the other hand, it shouldn't be too dry either, so add water in small amounts if needed. Soon you will figure out just the happy medium.
Add your waste in small heaps by digging a hole in the compost and adding the waste in one place. Cover it gently. The next time you add, dig in a different place and bury the waste. It takes about 3 weeks to fully decompose one bundle.
You should get some very dark, rich soil to add to your garden or houseplants -- all from what came out of your own kitchen scraps (that's the part I like the most)
The world just wouldn't be the same without its earthworm recycling systems!

Start with a big container. For the past year, I have been breeding worms in an old bucket but have been eyeing other containers to expand to something larger. I found terracotta and cement flower pots and chose to make the new vermi-bin in the cement one, mainly because of its size.
Step 1: Make a bed for your worms to rest in when they are not eating. You can take big sheets of newspaper and form tightly wadded balls to make about two layers of bedding at the bottom of your chosen bin. Now dampen this.
Step 2: Throw a bit of sand on top.
Step 3: Add your worms. You will need to get worms from another vermi-composter (that will be YOU soon enough). The type you need are called red wigglers. To be honest, my worms found me and asked me to start a vermi-compost for them. They were delivered in a load of cow manure for my garden; and when I looked at them I just knew they'd be happy in my bucket. They were reddish and wriggling...but are very, very tiny. THere are tons of them now because I feed them every few weeks.
Step 4: Don't become too attached to your worms...
Step 5: Now, in one area of the bin place your kitchen waste (tea/coffee grounds, rotten veggies, banana peels, eggshells, fruit peels, etc). This can pretty much include anything except dairy, meat and fish scraps. Almost everything else goes. My worms are currently working on the waste scraps from an untreated wooden dinosaur kit. You need to add waste in bundles so that there is always a resting area for the worms (the bedding and soil).
Step 6: Cover the whole thing with a little more dirt and shredded newspaper. Dampen this just a bit too.
Step 7: Now cover the entire compost bin with a big board or burlap tarp. SSssssh. THe worms like it to be dark and I presume quiet.
MAINTENANCE
The trick to maintaining things inside is to take peeks and see just what's happening in there. It isn't good if the bin gets too wet and mushy (a big mess, in fact) so you may need to move everything to one side and put in new newspaper bedding balls to absorb excess moisture. On the other hand, it shouldn't be too dry either, so add water in small amounts if needed. Soon you will figure out just the happy medium.
Add your waste in small heaps by digging a hole in the compost and adding the waste in one place. Cover it gently. The next time you add, dig in a different place and bury the waste. It takes about 3 weeks to fully decompose one bundle.
You should get some very dark, rich soil to add to your garden or houseplants -- all from what came out of your own kitchen scraps (that's the part I like the most)
The world just wouldn't be the same without its earthworm recycling systems!
19 July 2009
FELT BOOK COVERS
We had two birthdays for little girls this week. We used small memo notebooks from the local market and just decorated them up with some felt we had in the house. My daughter made the sunflower and I designed the heart.
Cut your felt to the exact size to wrap around your notebook.
Set out your felt design for the cover and dab glue to keep it in place.
Stitch it all down.
Carefully glue it onto the notebook. Be sure to use a strong glue/fabric glue and get the edges very well glued so that it doesn't start to peel off.
Load some heavy books on top of the book to make sure your cover is on there firmly.
Both girls loved their gifts!

Cut your felt to the exact size to wrap around your notebook.
Set out your felt design for the cover and dab glue to keep it in place.
Stitch it all down.
Carefully glue it onto the notebook. Be sure to use a strong glue/fabric glue and get the edges very well glued so that it doesn't start to peel off.
Load some heavy books on top of the book to make sure your cover is on there firmly.
Both girls loved their gifts!
13 July 2009
(RECYCLED) PARTY DECORATIONS
Lately I have been on a little kick to develop fun banners and strands for decorating a room for a holiday or birthday. While we were making these strings made from recycled greeting cards, my kids and I were thinking that it might be fun to 'make a party' from scratch. So, when guests arrive they have to make some decorations (while the cake is baking) and then make mini-pizzas once the decorations are in place. Some invitees might feel a bit chagrined to find that they were hired this way, but others might find it sort of entertaining....
1. STRINGS WITH RECYCLED GREETING CARD CIRCLES:
You will need scissors, string, glue, pencil, and various round objects of various sizes to trace for cutting out.
Cut out three circles of the same size and fold them all right down the middle with the pattern you want to show on the inside.
Glue one side and paste two halves together
Now run the string where the two halves come together
Put glue on the entire back side of the remaining circle and glue the full 3-D circle together with the string going in the top and out the bottom
Repeat with different sized circles.
Hope you can get an idea from the photo at the top.

2. TRIANGLE BANNER
This is so fun and easy. Cut a bunch of long triangles from large sheets of old drawing books or from newspaper, etc.
Have kids decorate the front and back sides with color and sequins, etc.
Staple the triangles over a string leaving a small gap in between
Let the party begin!

1. STRINGS WITH RECYCLED GREETING CARD CIRCLES:
You will need scissors, string, glue, pencil, and various round objects of various sizes to trace for cutting out.
Cut out three circles of the same size and fold them all right down the middle with the pattern you want to show on the inside.
Glue one side and paste two halves together
Now run the string where the two halves come together
Put glue on the entire back side of the remaining circle and glue the full 3-D circle together with the string going in the top and out the bottom
Repeat with different sized circles.
Hope you can get an idea from the photo at the top.
2. TRIANGLE BANNER
This is so fun and easy. Cut a bunch of long triangles from large sheets of old drawing books or from newspaper, etc.
Have kids decorate the front and back sides with color and sequins, etc.
Staple the triangles over a string leaving a small gap in between
Let the party begin!
03 May 2009
LEAF PRINTING
I've been wanting to try leaf printing on fabric for a long time now.
My daughter and I purchased a very low cost marking fabric at the local market (Rs 28 per meter) and bought some green fabric paints. We made our prints by painting the back side of each leaf where the veins are and pressing it firmly down on the cloth. Much to our surprise, almost every print was successful because the leaves we collected were just so beautiful. Each one, so different.
We cut the fabric into patches and added some other stamping designs to add color.
Then we realized they were perfect for the tote bags we had made from all the scrap fabrics i had sitting around the house so we are now stitching them onto these...leaving the edges to fray in a natural sort of way :-)


My daughter and I purchased a very low cost marking fabric at the local market (Rs 28 per meter) and bought some green fabric paints. We made our prints by painting the back side of each leaf where the veins are and pressing it firmly down on the cloth. Much to our surprise, almost every print was successful because the leaves we collected were just so beautiful. Each one, so different.
We cut the fabric into patches and added some other stamping designs to add color.
Then we realized they were perfect for the tote bags we had made from all the scrap fabrics i had sitting around the house so we are now stitching them onto these...leaving the edges to fray in a natural sort of way :-)

25 April 2009
HAPPY EARTH DAY!

For Earth Day this year, my daughter made small pencil stands in the shape of the earth out of clay. She also raided various garbage heaps near remodeling sites to find old slabs of kitchen/bathroom tiles and marble to make artsy designs on. She and her friends held a small exhibition at school and raised money to donate to Greenpeace, which has an office in Kolkata now!
We used clay but did not get as far as firing it...but the earth pencil stand my daughter made a year and a half ago is still standing strong so perhaps firing is not really necessary.

26 March 2009
FELT WALLET
Felt! It is a perfect fabric for getting kids starting with basic stitching and tailoring concepts...because there is no need for hemming and you can always get out the glue with the going gets tough.
My son is proud to keep his pocket money in this little wallet he made all by himself. The stitches are beginners stitches but they keep the coins in! And that's all that matters.
Decorations are easily cut out of felt and can be glued on first...you may want to help by adding a few stitches later on for staying power.
Bean bags, wall pockets, frames...have a felt fest soon.

My son is proud to keep his pocket money in this little wallet he made all by himself. The stitches are beginners stitches but they keep the coins in! And that's all that matters.
Decorations are easily cut out of felt and can be glued on first...you may want to help by adding a few stitches later on for staying power.
Bean bags, wall pockets, frames...have a felt fest soon.
15 December 2008
Calendar Time
I save all my children's artwork but don't always know how to display or use it. Finding nice ways of putting the best pieces to use is always in the back of my mind.
So we bought large drawing books and then printed calendar pages off of the internet (go to free printable calendars and choose one you like for 2009). The pages were cut and glued into the drawing book and then each page was embellished with artwork from this past year.
Who will be the lucky recipients of these 2009 art calendars??

So we bought large drawing books and then printed calendar pages off of the internet (go to free printable calendars and choose one you like for 2009). The pages were cut and glued into the drawing book and then each page was embellished with artwork from this past year.
Who will be the lucky recipients of these 2009 art calendars??
02 December 2008

Last year I was very inspired by this list which someone posted on their blog (I am sorry I cannot remember which one but I remember that it was shared)..but then forgot about it. I found it again and am going back to my original plan: to print it in fun fonts, change it to suit my own children and their environment...roll it up with a bow and pop it in the kids' stockings for the holidays!
I think you will find it a great list too -- and will want to try them out even if you are all grown up already!
60 ways to leave your mother (alone)
Create a fairy world.
Put a blanket on the grass and pretend it’s a raft, the grass is the ocean or river. and you are adrift! Think about what supplies you would need for this adventure.
Prepare an Imaginate Box with bits of leftover materials (string, wire, cassette tape, watch parts, yarn, shells, bottle caps, pages from ruined books, magazines, fabric snippets, buttons, paint swatch chips, plastic spoons, assorted trash, etc.) to have on hand for spontaneous art projects.
Draw an original comic strip of at least 3 panels.
Create a scavenger hunt for your parents. Make it difficult!
Submit some art to The Telekids section of the newspaper
Read an interesting book to a younger sibling. With enthusiasm. And lots of silly voices.
Make and send postcards to all your friends.
Create a picture with seeds and/or beans by gluing various types on a sturdy piece of cardboard. plain white glue works fine. Also try this with pasta, which comes in lots of fun shapes like stars and letters.
Make blue jello in a clear glass dish and “float” gummy fish inside when it starts to set. Eat it for dessert.
Put on some music and dance with abandon. Or just plain crazy.
Think up a really scary story to tell around the fire next time we go camping. You might want to write it down!
Learn how to hello and your name in another language. Or two.
Draw coloring pages for your little brother or sister. That they will enjoy.
Find an ant hill and place an apple slice on top. Watch. Or put bits of different foods on a plate nearby and watch to see what the ants like best to eat, second best and so on.
Make up a secret code and write a letter to a friend using the code (be sure to include decoding key!)
Make a collage with materials from your Imaginate Box.
Make a necklace and/or bracelet by stringing colorful pasta on elastic or string. (You can color pasta by adding it along with a little rubbing alcohol and some drops of food coloring to a ziploc bag and shaking well. Dry on newspaper.) Or string beads, cereal, buttons, tiny bits of fabric, etc.
Write down and/or draw all the different insects you see in just one day.
Listen to bird calls online and try to imitate them.
Type a review of the last movie you saw or book you read.
Create a play, opera or puppet show. Practice, then perform for your family. Make tickets for your performance.
Call your grandmother or best friend just to chat.
Make a treasure map of your yard or house. Make sure it looks dirty, wrinkled and torn and really authentic!
Have a treasure hunt (don’t forget to bury the treasure.)
Find a penpal.
Lie on the grass and look for shapes in the clouds.
Talk like a pirate for an entire day. And dress like one, if you dare. (And don’t forget your pirate name.)
Mail yourself a letter.
Write a REAL letter and mail it to your favorite relative.
Write a letter to a soldier. Or send an e-card.
Play catch with someone.
Make cookies, pudding or a cake and surprise a neighbor with a plate of them.
Write some jokes.
Make a joke book using jokes collected from every person in your family. Call your grandparents if you can. Knock-knock jokes are acceptable. Staple the joke pages together and keep the book handy for when everyone needs a good laugh.
Make Christmas ornaments then pack them away for a surprise this winter.
Lie on the sidewalk or driveway and let someone draw your outline with sidewalk chalk. Make silly poses and keep drawing.
Use old pillowcases to have a sack race (especially fun if you’re kind of tall.)
Make a mobile with materials from your Imaginate Box.
Make up a song or poem about your pet. Record it, if possible.
Wash your bike.
Decorate your bike for a parade. Have a parade (even if you’re the only participant.)
Read about constellations during the day and then find them in the night sky.
Start planning your Halloween costume.
Make sock or lunch bag puppets of your favorite characters from a few different books or t.v. shows. Perform a puppet show in which they meet and become friends.
Paint
Create a miniature house using a cardboard box (shoebox size or larger) with one side removed. Use recycled food packages and masking tape to create tables, chairs, countertops, refrigerators, etc. Cut openings for windows and doors. Make curtains from fabric scraps, Use bottlecaps for stove burners, empty thread spools for chairs, etc.
Write or draw the story of your life so far.
Learn your name in sign language.
Find something in your house from a different country, then look up that country online or in an encyclopedia to learn more about it.
Make a list of things you’d like to learn more about. Take it to the library on your next visit and bug the librarian to help you find good books on at least 2 of the topics on your list.
Make some fruit from paper mâche (this will take a few days.)
Close your eyes and draw a quick doodle on a piece of paper. Open your eyes and complete the drawing.
Throw a fancy party for your pet. Invite all your stuffed animals.
Make an obstacle course in your backyard. Time yourself and others as you complete it.
Practice cartwheels. Or somersaults. Or walking on your hands.
Lie in your bed and ponder what needs pondering.
Decorate a box and lid; use it to hold treasures and mementos from your summer.
Make a fairy stew from flower petals and leave it out for the fairies to find.
Leave a shallow dish of beer in your garden if you’d like to see what slugs look like once they are, uh, dead.
Get a book on knot tying out of the library and learn to tie some knots (but no fair using them on your siblings).
Learn to identify all the trees in your yard/neighborhood.
Write the story of a day in your life as a grown up.
Put a white flower in a vase with water and food coloring.
Learn to write upside down. No, no — YOU stay right side up — just write the letters upside down on the paper.
12 September 2008
Ribbon bookmarks
Sometimes little girls sort of grow out of their ribbons and it is time to find new uses for them...that's what got me thinking about what I can do with all the beautiful ribbon we have around our house.
To make, fold ribbons in three so there is a piece that goes about half way down the back. Now, cut a tiny slip just at center-top for the loop to go through; then stitch up the sides. When you are stitching near the loop, you will need to do some reinforcement stitches so that it is sewn in properly. For the back, give a tuck for the hem and stitch across. Knot and voila!

To make, fold ribbons in three so there is a piece that goes about half way down the back. Now, cut a tiny slip just at center-top for the loop to go through; then stitch up the sides. When you are stitching near the loop, you will need to do some reinforcement stitches so that it is sewn in properly. For the back, give a tuck for the hem and stitch across. Knot and voila!
31 August 2008
She rocks
A trip to a riverside or beach can yield some good rock collections. But what to do with all the rocks the kids lug home??
My daughter used water-based glass colours to make these little designs on her rocks. They are great to give as gifts, and make nice good luck charms to keep in your pocket. Like worry stones.

My daughter used water-based glass colours to make these little designs on her rocks. They are great to give as gifts, and make nice good luck charms to keep in your pocket. Like worry stones.
19 July 2008
puzzle recycling
One of life's sadder moments is when you realize that you have lost so many pieces to a particular puzzle, that it is no longer satisfying to do the thing anymore....
The backs of puzzles (especially wooden ones like this) are great backgrounds for little paintings and collages. This one was done on the back of a wooden puzzle that was given to me by a friend who moved away (sniff) but which turned out to have quite a few missing pieces (sniff-sniff).
But there's a lot of recycling going on because we are using the small wooden puzzle pieces to paint and attach magnets to the back of for gifts.

The backs of puzzles (especially wooden ones like this) are great backgrounds for little paintings and collages. This one was done on the back of a wooden puzzle that was given to me by a friend who moved away (sniff) but which turned out to have quite a few missing pieces (sniff-sniff).
But there's a lot of recycling going on because we are using the small wooden puzzle pieces to paint and attach magnets to the back of for gifts.
27 June 2008
Book Covers
Where I live, it is Back-to-school season so I pulled out my handy dandy collection of reusables and found old maps, shopping bags, and calendars to cover all the notebooks and textbooks with -- and brighten up the ole bookbag in the meanwhile.

10 April 2008
Bread Spread Concocting
If all else fails, kids generally like to eat a piece of toast so lately we have been mixing up different bread spreads to liven these up. Our favorites so far have been...
• Butter, honey (or maple syrup), and cinnamon
• Tahini and lots of sweet honey (or pekmez molasses; this is a variation on a spread that a Turkish friend taught me)
• Butter, garlic, parsley and basil from our garden. We melted this up on the stovetop and now have it ready to make up some garlic toast in the toaster oven at any time. This is great with homemade cream soups (stay tuned for those recipes too!!)
The kids enjoy the mixing up and I enjoy having something easily on hand that they want to eat. So spread the LOVE, I say!

• Butter, honey (or maple syrup), and cinnamon
• Tahini and lots of sweet honey (or pekmez molasses; this is a variation on a spread that a Turkish friend taught me)
• Butter, garlic, parsley and basil from our garden. We melted this up on the stovetop and now have it ready to make up some garlic toast in the toaster oven at any time. This is great with homemade cream soups (stay tuned for those recipes too!!)
The kids enjoy the mixing up and I enjoy having something easily on hand that they want to eat. So spread the LOVE, I say!
Subscribe to:
Posts (Atom)